Hello Fellow Readers, To properly plant trees and shrubs on a hillside, you should create a platform by elevating the downhill side or cutting into the hill—a lesson that leads to a story about a cherished tree planted in my sister’s hillside garden.
Mom especially admired the Red Maple.
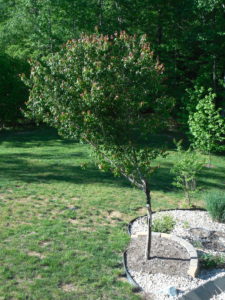
In the Spring of 2011, my sister Dot, who lives in Chesterfield, Virginia, planted a Red maple (Acer rubrum) in the tiered garden she and her hubby built to manage the slope in their backyard. At the time, our dear Mom had just moved in, and I recall her reminiscences over how hard Dot and Jim worked on the project weekend after weekend. Mom especially admired the maple tree with its red-tinged emerging leaves and glorious fall color. She had missed the change of seasons over the 30 years she lived in Florida.
In August of the same year, Hurricane Irene came through gusting eighty-mile-an-hour winds that took down a two-foot caliber oak and a handful of surrounding trees. Thankfully the new maple didn’t fall, though Dot and Jim had to straighten the newbie whose leaves were battered and bark severely damaged on the side of the fallen oak.
Soon after, limbs began to die back, which they pruned year after year. Dot asked if I’d assess the remaining half a tree. One-sided-ness symptoms often indicate that part of the root system is not taking up proper nourishment or moisture, one of the risks of planting on a slope. The wound on the trunk is indeed another contributing factor.
How to properly plant trees and shrubs on a hillside:
When planting trees and shrubs on a slope, you should create a platform by elevating the downhill side or cutting into the hill. Often a combo of both techniques creates the optimum flat space. The area should be at least three times the root ball’s width (I prefer five times the root ball for large trees) and firm enough to stand on while planting. When adding soil on the hill’s downside, secure the soil with rocks or a retaining wall.
Then follow proper planting protocols of digging the hole 2 to 3 times the root ball’s width and only as deep as the root ball. Supplement the soil with rich organic matter, firmly filling the hole to eliminate air pockets. Fertilizing can add to plant stress when planting, so wait until after the plant becomes established. Top with 2 to 3 inches of undyed wood mulch (my fav is hemlock mulch), and keep it clear of trunks or stems to prevent disease.
Dot and Jim’s platform was not large enough.

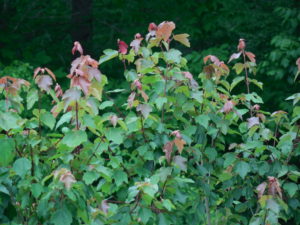
“Hi, Sis. Here is a picture of the recovering red maple. Isn’t the new growth wonderful? A promise of rebirth and new beginnings.”
It turns out Dot and Jim’s platform was not large enough. When they removed the mulch, they found exposed roots. They put on their DIY hats to remediate the situation by extending the retaining wall and adding topsoil. Over the last three years since the remediation, the tree didn’t rebound. Sadly, last fall, it was decided that they would cut it down come spring. Especially sad knowing how much Mom admired the tree.
Lo and behold, as the tree woke up this spring, the canopy looked like it was filling in on the empty side. As if the tree is finding its new balance, which lifts our hearts. Dot emailed a picture of the revival. “Mom’s tree is making an astounding recovery!” Plants genuinely are resilient, especially with the love and admiration of caregivers. It’s comforting to imagine that Mom may still have a nurturing influence from above. Happy Memorial Day. Garden Dilemmas? AskMaryStone@gmail.com and your favorite Podcast App.
Enjoy more to the story in Episode 70 of the Garden Dilemmas Podcast:
Column updated 8/20/22
About Pruning Sealers: Normally, I don’t recommend pruning sealers as they can trap moisture and encourage disease and decay. However, after hearing about the insect invasion issues on the wound Dot had been managing with insecticides, her decision to paint the tree with the black stuff may be warranted. She even taped off the good bark before spraying the sealer. Leave it to my dear sister – no caregiving details are ever left undone.
Link to a related column you’ll enjoy- A Steep Woodland Garden


